
Let's begin 2015 by trying to detail an Oracle Real Application Cluster 11G Release 2 Installation on Oracle Enterprise Linux 6 (the update used during this install is 6.4 , but this will most probably works with other OEL6 update).
To make things easier (and more readable), I've divided this post in 04 main sections. The first section is just about Physical Installation, the second is about OS Installation and Pre-Installation Steps, the third one will deal with Grid Infrastructure Software Installation and the Fourth is about RDBMS Software Installation.
I. Physical Installation:
This very short section is just about the description of Physical Installation performed for this Installation. As a picture is worth a thousands words, let's start by showing a small picture of the Infrastructure we are deploying.

So, we've 02 Physical Nodes with 04 Ethernet Ports for each nodes. Two of these Ethernet Ports will be slaves of Bond0 (active-passive mode) and connected to a Public Network while the others two ports will be initially configured as Independent Interfaces and connected to a Private Network. In fact, Rather than bonding these private NICs, we leave them both configured with static fixed addresses and during the installation, we'll specify both interfaces as private. Grid Infrastructure will assign a virtual IP address in 169.245.x.x network to these Interfaces and use HAIP protocol. The result is equivalent to Bonding in Load-balancing Mode.
For Storage connectivity, we have 02 FC Ports connected on a Storage Area Network, Shared Disks that will be used later as ASM Devices are provided by a Shared Storage connected to this SAN.
II. OS Installation and Pre-Installation Steps:
Having Physical Nodes Installation completed, we can move forward with the OS Installation and the Cluster Prerequisites Configuration.
II.I: OS Installation:
The Systems Installation is fully completed using Kickstart file. I won't discuss the many advantages offered by Kickstart Installation, but will just highlight one of the main benefit I've found when using it for a cluster Installation (Not just Oracle RAC, but also RHEL Cluster, Linux-HA and other cluster frameworks). This advantage is the almost perfect symmetry between the clustered nodes (better make sure of that for a cluster Installation). There's also a large number of configurations that can be completed using the %post section of Kickstart . For instance, I've populated the /etc/hosts file and configured NTP in the %post section of the Kickstart File shown below.
In fact, I could have automated all the configurations that will be completed in the section II in this kickstart, but I've preferred to leave it like that in order to well describe these configurations in the next sections....
To make things easier (and more readable), I've divided this post in 04 main sections. The first section is just about Physical Installation, the second is about OS Installation and Pre-Installation Steps, the third one will deal with Grid Infrastructure Software Installation and the Fourth is about RDBMS Software Installation.
I. Physical Installation:
This very short section is just about the description of Physical Installation performed for this Installation. As a picture is worth a thousands words, let's start by showing a small picture of the Infrastructure we are deploying.
So, we've 02 Physical Nodes with 04 Ethernet Ports for each nodes. Two of these Ethernet Ports will be slaves of Bond0 (active-passive mode) and connected to a Public Network while the others two ports will be initially configured as Independent Interfaces and connected to a Private Network. In fact, Rather than bonding these private NICs, we leave them both configured with static fixed addresses and during the installation, we'll specify both interfaces as private. Grid Infrastructure will assign a virtual IP address in 169.245.x.x network to these Interfaces and use HAIP protocol. The result is equivalent to Bonding in Load-balancing Mode.
For Storage connectivity, we have 02 FC Ports connected on a Storage Area Network, Shared Disks that will be used later as ASM Devices are provided by a Shared Storage connected to this SAN.
To close this section, I have few words about Nodes Physical Requirement: The minimum required RAM is 2.5 GB. For systems with 2.5 GB to 16 GB RAM, Oracle recommends to use swap space equal to RAM. For systems with more than 16 GB RAM, use 0.75 x RAM as the swap space.
II. OS Installation and Pre-Installation Steps:
Having Physical Nodes Installation completed, we can move forward with the OS Installation and the Cluster Prerequisites Configuration.
II.I: OS Installation:
The Systems Installation is fully completed using Kickstart file. I won't discuss the many advantages offered by Kickstart Installation, but will just highlight one of the main benefit I've found when using it for a cluster Installation (Not just Oracle RAC, but also RHEL Cluster, Linux-HA and other cluster frameworks). This advantage is the almost perfect symmetry between the clustered nodes (better make sure of that for a cluster Installation). There's also a large number of configurations that can be completed using the %post section of Kickstart . For instance, I've populated the /etc/hosts file and configured NTP in the %post section of the Kickstart File shown below.
In fact, I could have automated all the configurations that will be completed in the section II in this kickstart, but I've preferred to leave it like that in order to well describe these configurations in the next sections....
II.2: Network Configuration:
As described in the first Section, we've 02 Physical Nodes with 04 Physical Ethernet Interfaces . For redundancy purpose, the first two network interfaces are slaves of Bond0 and will be used for public IP. Though we've configured the 02 Private Interfaces as Independent Interfaces, HAIP will automatically be configured during the Grid Infrastructure Installation.
In fact, HAIP is enabled for the private network by selecting multiple interfaces to use as private interfaces during the Grid Infrastructure Installation. This functionality is available starting with Oracle Grid Infrastructure 11g Release 2(11.2.0.2). Though it's enabled by default, we still have to set IP on the interfaces and plumb/up these interfaces. In fact, Oracle Grid currently creates a Virtual IP on the private network adapters using the 169.254.*.* subnet for the HAIP. The purpose of HAIP is to load balance across all active interconnect interfaces, and failover to other available interfaces if one of the existing private adapters becomes unresponsive.
Each node will need a Virtual IP, and we'll also need a set of 03 Scan IPs. Below is a table with Details about this IP Address scheme.
Node Name
|
Public IP / Interfaces
|
Private IP Interface (HAIP)
|
Public Virtual IP
|
dbnode01
|
192.168.0.11
(bond0)
|
192.168.1.41 (eth2)/
192.168.1.43 (eth3) |
192.168.0.15
|
dbnode02
|
192.168.0.12
(bond0)
|
192.168.1.42 (eth2)/
192.168.1.44 (eth3) |
192.168.0.16
|
Scan Name
| |||
dbnode-scan.stivesso.local
|
192.168.0.17
|
192.168.0.18
|
192.168.0.19
|
Public and Private IPs were configured during the System Installation, with Public Interfaces being bonded as bond0 while private Interfaces were configured as Independent Interfaces. Below, we can see the output of the configuration applied by the KickStart configuration on these Interfaces.
The Public/Private and VIP with names associated are all added to the DNS and to the systems hosts files (see hosts file below, populated during the Kickstart Installation), while The scan IP/names associations must only be added to the DNS.
***/etc/hosts***
***DNS resolver / Make sure than scan name can be resolved***
The other important Network Service to configure is the NTP as we must make sure that server's clocks are synchronized. For this case I use a set of Internal NTP Servers and modified just the server statement in /etc/ntp.conf (replaced the default NTP Servers addresses by my own)
Also, to make sure that I won't hit PRVF-5436 error related to NTP configuration,I had to add the -x option to ntpd configuration and restart the NTP daemon. That was also completed during the Kickstart Installation. Below is the file that was populated.
Finally, the following Kernel Parameters need to be set on Private Interfaces for all the nodes. That'll disabled the RPF. Reverse Path Filtering (RPF) is a security feature which allow the kernel to throw away packets if the reply of a packet may not go through the interface it was received on.
II.3 User Accounts and System Parameters
Let's now complete the creation of required User accounts and Systems parameters setting. Note that Oracle recommends the usage of different users accounts for the installation of the Grid Infrastructure (GI) and the Oracle RDBMS home. Following this recommendation , I'm trying to have Grid Infrastructure owned by user 'grid' and Oracle RDBMS owned by user 'oracle'.
Most of the pre-installation configuration tasks can be completed by using the Oracle RDBMS Server 11gR2 Pre-install RPM for Oracle Linux 6 x86_64 (64 Bit) architecture, available from the Unbreakable Linux Network, or via the Oracle Public Yum repository. This package replaces the previous Oracle Validated RPM.
The Oracle RDBMS Pre-install RPM does the following:
* Automatically installs any additional packages needed for installing Oracle Grid Infrastructure and Oracle Database 11gR2 (11.2.0.3).
* Creates an oracle user, and creates the oraInventory (oinstall) and OSDBA (dba) groups for that user. For security purposes, this user has no password by default and cannot login remotely. To enable remote login, please set a password using the "passwd" tool.
* Sets and verifies sysctl.conf settings, system startup parameters, user limits, and driver parameters to the minimum acceptable values based on recommendations from the Oracle Database.
Below is the package Installation procedure details (on both nodes), using Oracle Public Yum repository.
To complete with software Installation, I recommend to also install cvuqdisk which is coming with the Grid Software, it is located under the rpm folder of the Grid Installer Binaries (see below).
As Oracle recommends different users for the installation of the Grid Infrastructure and the Oracle RDBMS home, the next task is to create the grid Users and required Groups manually. We're also settings the user limits for this newly created Grid User. So on every Cluster Node, let's run the following (on both nodes).
Having the Users/Groups configured, we can move forward with the creation of the required Directory for both Oracle and Grid Users. As seen in my kickstart file, I'm using lv_u01 (mounted on /u01) for Oracle Software Binaries. I'm using the script below to complete the creation of the required directories and setting of their permissions (see comments in the script for details about each directory)
Bash Profile for grid User on Node1
Bash Profile for grid User on Node2
Finally, we need to create password for both Oracle and Grid using passwd command (just showing this as an example, Create your own password in a more secure way:-) )
II.4 Shared Storage Multipath Configuration
Most of the pre-installation configuration tasks can be completed by using the Oracle RDBMS Server 11gR2 Pre-install RPM for Oracle Linux 6 x86_64 (64 Bit) architecture, available from the Unbreakable Linux Network, or via the Oracle Public Yum repository. This package replaces the previous Oracle Validated RPM.
The Oracle RDBMS Pre-install RPM does the following:
* Automatically installs any additional packages needed for installing Oracle Grid Infrastructure and Oracle Database 11gR2 (11.2.0.3).
* Creates an oracle user, and creates the oraInventory (oinstall) and OSDBA (dba) groups for that user. For security purposes, this user has no password by default and cannot login remotely. To enable remote login, please set a password using the "passwd" tool.
* Sets and verifies sysctl.conf settings, system startup parameters, user limits, and driver parameters to the minimum acceptable values based on recommendations from the Oracle Database.
Below is the package Installation procedure details (on both nodes), using Oracle Public Yum repository.
To complete with software Installation, I recommend to also install cvuqdisk which is coming with the Grid Software, it is located under the rpm folder of the Grid Installer Binaries (see below).
As Oracle recommends different users for the installation of the Grid Infrastructure and the Oracle RDBMS home, the next task is to create the grid Users and required Groups manually. We're also settings the user limits for this newly created Grid User. So on every Cluster Node, let's run the following (on both nodes).
Note that the UID for the Oracle User created by Oracle-rdbms-server-11gR2-preinstall is 54321, so I choose the next UID for Grid (same for the groups)
Now, we've to modify the User Limits settings for grid User (can also adjust if needed). That was done by the installation of the oracle-rdbms-server-11gR2-preinstall Installation for Oracle User, below is /etc/security/limits.conf after this package's installation.
We're just modifying the file by adding Grid Settings as seen below:
Having the Users/Groups configured, we can move forward with the creation of the required Directory for both Oracle and Grid Users. As seen in my kickstart file, I'm using lv_u01 (mounted on /u01) for Oracle Software Binaries. I'm using the script below to complete the creation of the required directories and setting of their permissions (see comments in the script for details about each directory)
The next task of this sub-section is to reflect the created directory structure to grid and oracle Users environment by setting some of their environment variables. Note that for Oracle User, I'm using the same parameters on all the nodes, while ORACLE_SID for grid user across nodes differs.
Bash Profile for Oracle User on the 02 nodes
Bash Profile for grid User on Node1
Bash Profile for grid User on Node2
Finally, we need to create password for both Oracle and Grid using passwd command (just showing this as an example, Create your own password in a more secure way:-) )
II.4 Shared Storage Multipath Configuration
As described in Section I, the shared Disks are sitting on an external storage, and are accessible through a Multipath Software. For this configuration, we're making use of DM-Multipath. But before getting to Multipath configuration, let's summarize in a table the Shared Physical LUNs and the role they're supposed to play.
The first three devices are to be added in a dedicated Disk Group for OCR/Vote Disk while the last one will be used for DB Data Disk Group. Before moving with Multipath Configuration, let's just rescan the scsi Devices to make sure that all the allocated LUNs are present on the Systems (to do on all the Cluster Nodes).
We can now start the multipath configuration by using mpathconf to make the initial configuration easy.
Note that most of the steps below are completed on one node. This node's Multipath configuration will then be replicated to the other by copying /etc/multipah.conf
Enable and start the Multipath service
Put in place a very minimal configuration (just to see multipath device), the reload multipath and list devices in this configuration
Let's rename these devices by giving them the more comprehensible names that are in the Disk table above. For that we're adding the following to multipath.conf and reload paths.
Node2 can now be configured by replicating the Node1 configuration.
To complete with this subsection, we've to create a single partition on the Multipath disks. This procedure is mostly completed on one Node, with the exception of kpartx commands which are used to make sure that the physical path for the created partition exist on the nodes. Below is the output for 01 disk , this must be done for the all the shared disks.
II.5 Shared Storage / Oracle ASMLIB
Now that we have our shared disks well configured under DM-Multipath, we can move forward with ASMLIB Configuration. Below is a small recap of what we're aiming to complete in this sub-section.
Share Devices
|
Multipath Name
|
Size
|
Description
|
asm-ocr-disk1
|
1GB
|
Oracle RAC OCR Disk
|
|
asm-ocr-disk2
|
1GB
|
Oracle RAC OCR Disk
|
|
asm-ocr-disk3
|
1GB
|
Oracle RAC OCR Disk
|
|
asm-data-disk1
|
500GB
|
ASM Data Disk
|
The first three devices are to be added in a dedicated Disk Group for OCR/Vote Disk while the last one will be used for DB Data Disk Group. Before moving with Multipath Configuration, let's just rescan the scsi Devices to make sure that all the allocated LUNs are present on the Systems (to do on all the Cluster Nodes).
We can now start the multipath configuration by using mpathconf to make the initial configuration easy.
Note that most of the steps below are completed on one node. This node's Multipath configuration will then be replicated to the other by copying /etc/multipah.conf
Print the current Multipath configuration, by default it's disabled
Enable and start the Multipath service
Put in place a very minimal configuration (just to see multipath device), the reload multipath and list devices in this configuration
Let's rename these devices by giving them the more comprehensible names that are in the Disk table above. For that we're adding the following to multipath.conf and reload paths.
Node2 can now be configured by replicating the Node1 configuration.
To complete with this subsection, we've to create a single partition on the Multipath disks. This procedure is mostly completed on one Node, with the exception of kpartx commands which are used to make sure that the physical path for the created partition exist on the nodes. Below is the output for 01 disk , this must be done for the all the shared disks.
II.5 Shared Storage / Oracle ASMLIB
Now that we have our shared disks well configured under DM-Multipath, we can move forward with ASMLIB Configuration. Below is a small recap of what we're aiming to complete in this sub-section.
Physical Disk
|
ASMLIB Disk Name
|
ASM Disk Group
|
ASM Redundancy
|
/dev/mapper/asm-crs-disk1p1
|
OCR_DISK1
|
OCR
|
High redundancy
|
/dev/mapper/asm-crs-disk2p1
|
OCR_DISK2
|
OCR
|
High redundancy
|
/dev/mapper/asm-crs-disk3p1
|
OCR_DISK3
|
OCR
|
High redundancy
|
/dev/mapper/asm-data-disk1p1
|
DATA_DISK1
|
DATA
|
External redundancy
|
Before diving in technical matters, let's first describe what is Oracle ASMLIB. It is an optional support library for the Automatic Storage Management feature of the Oracle Database and allows an Oracle Database using ASM more efficient and capable access to the disk groups it is using.
The Oracle ASMLib kernel driver is now included in the Unbreakable Enterprise Kernel. No driver package needs to be installed when using this kernel. The oracleasm-support and oracleasmlib packages still need to be installed from ULN. While the driver and support tools are on the Oracle Linux installation media, the oracleasmlib RPM is not (this package allows Oracle to access the kernel driver).
Oracleasm-support is available on the Installation Media and on the Public Yum repository, That isn't the case for oracleasmlib which is only available on ULN. Subscribers to ULN can use yum(8) or up2date(8) to download and install the package on their servers. Non-subscribers are free to use the similar package built for RHEL on their Oracle Linux machines. In this case, we're downloading the similar package built for RHEL (available here)
Let's complete the Installation of Oracleasm-support and oracleasmlib.
In its default configuration, ASMLib will choose the first path it finds. This is the first path as reported by Linux. Depending on your storage driver, it could be the multipath, or it could be one of the single paths. We want ASMLib to always use the multipath disk and that must be told via its configuration.
On RHEL like system, the main configuration file is /etc/sysconfig/oracleasm (part of oracleasm-support). The following 02 lines are added to this file, the first is instructing ASMlib to scan the multipath disks (starting with dm under /dev) and the second to ignore all sd drives.
** /etc/sysconfig/oracleasm **
Note that when scanning the devices, only the device names known by the kernel are scanned. With device-mapper, the kernel sees the devices as /dev/dm-XX.
The /dev/mapper/XXX names are created by udev for human readability.So, Any configuration of ORACLEASM_SCANORDER or ORACLEASM_SCANEXCLUDE must use the dm prefix.
We can now complete the oracleasm configuration by running the oracleasm command with its initial configuration switch (-i) , Note that this initial configuration will re-write the /etc/sysconfig/oracleasm (but will keep SCANORDER and SCANEXCLUDE configuration done before). This must be performed on both nodes.
We can now complete the oracleasm configuration by running the oracleasm command with its initial configuration switch (-i) , Note that this initial configuration will re-write the /etc/sysconfig/oracleasm (but will keep SCANORDER and SCANEXCLUDE configuration done before). This must be performed on both nodes.
Load ASM Module manually (on both nodes),
Now we can create our ASM Disk, this must be done only on one node.
Scan and list the newly created disks on both nodes,
With that done, we are done with this Section and can start the Oracle Grid Infrastructure Software Installation...
III. Oracle Grid 11GR2 Software Installation:
Let's start the grid Infrastructure Software Installation by running runInstaller (needs graphical environment) as Grid User as described in the screenshots below.


At this stage, we will need to add the other cluster node, identify Network Interfaces and Setup/Test SSH Connectivity.


Click on SSH Connectivity, fill OS Password and run a Test and then setup.


Testing Again,

Click on "identify Network Interface", and mark both private/public Interfaces


With that completed, we can move to the next step where the Cluster Registery Storage Type will be set to "Oracle Automatic Storage Management" and we'll specify SYSASM password.

Just a few comments about the following section (Disk Group Selection)
For Disk Group Name— Enter a name, for example: OCR_VOTE.
For Redundancy— For your OCR and voting disks, select High if five ASM disks are available, select Normal if three ASM disks are available, or select External if one ASM disk is available and you're managing redundancy in an external disk (not recommended).
Also, If no candidate disks are displayed, click Change Discovery Path and enter ORCL:*or /dev/oracleasm/disks/*. Ensure that you have marked your Oracle ASM disks, for more informations see,"Using ASMLib to Mark the Shared Disks as Candidate Disks"


Note that for the step below, I faced the bug identified here ( Metalink Note 1267569.1) "Device check for ASM" and choose to ignore (as recommended).


At this stage, we should go back to the Shell and run the 02 scripts requested as root. For every script, run it on the local node first, after successful completion we can run in parallel on other nodes.


IV. Installing Oracle 11g R2 Database (RDBMS) Software:
As Oracle User, let's run runInstaller


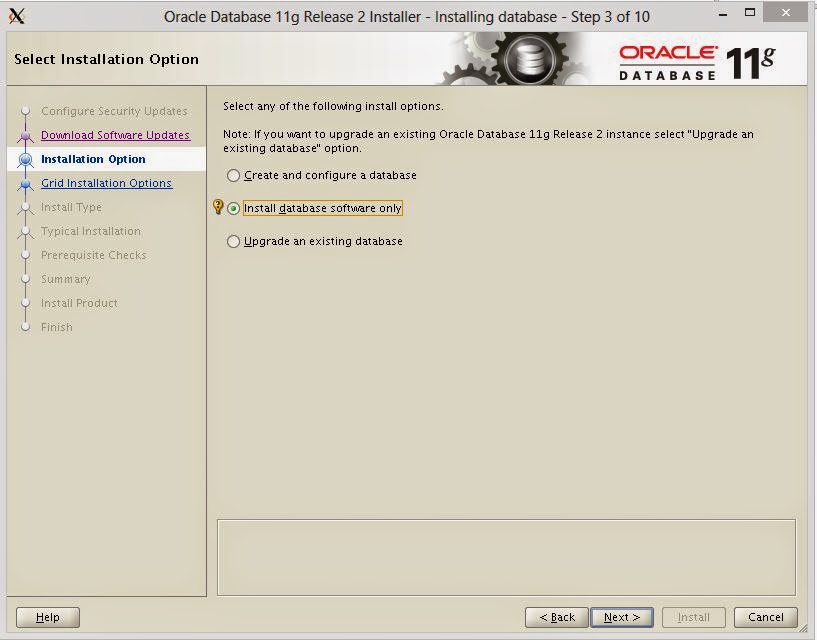

Click on SSH Connectivity and Setup/Test the connectivity


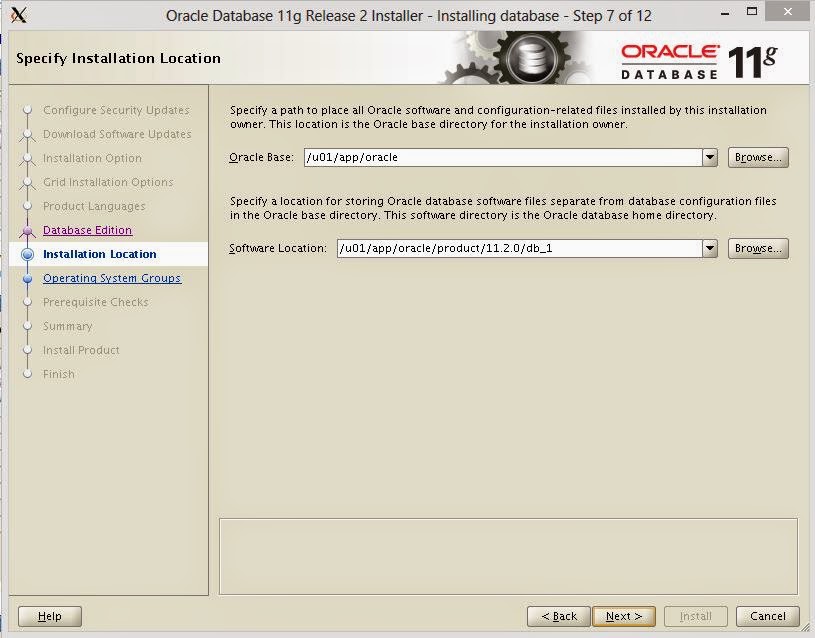


Again, we've to go back to the shell as root and run the following on both nodes.

With both Grid and Database Software Installation completed, the next step will most probably be the creation of Data Disk Group and DB Creation...
References:
http://sethmiller.org/it/oracleasmlib-not-necessary/
http://en.community.dell.com/techcenter/enterprise-solutions/w/oracle_solutions/3336.how-to-deploy-oracle-11gr2-on-rhel6oracle-linux-6
http://uhesse.com/2010/10/06/voting-disk-and-ocr-in-11gr2-some-changes/
http://dnccfg.blogspot.com/2012/09/koracle11gr2racsetup.html
http://oracleinaction.com/haip/


